 RunMacro
RunMacro Documentation
Create your first robot, then go further as needed.
Clear step-by-step guides to create, run, and improve robots for repetitive computer work.
Wait for On-Screen Pixel Color Change (Wait Pixel) in RunMacro
Wait Pixel monitors RGB values at specific screen coordinates in RunMacro, resuming execution the moment target colors match with minimal CPU usage.
Prerequisites#
- Target screen pixel is visible and unobscured by overlapping windows.
Supported modes#
- Desktop Mode — Samples 1x1 pixel bitmaps via Windows GDI with ultra-fast responsiveness.
What it does#
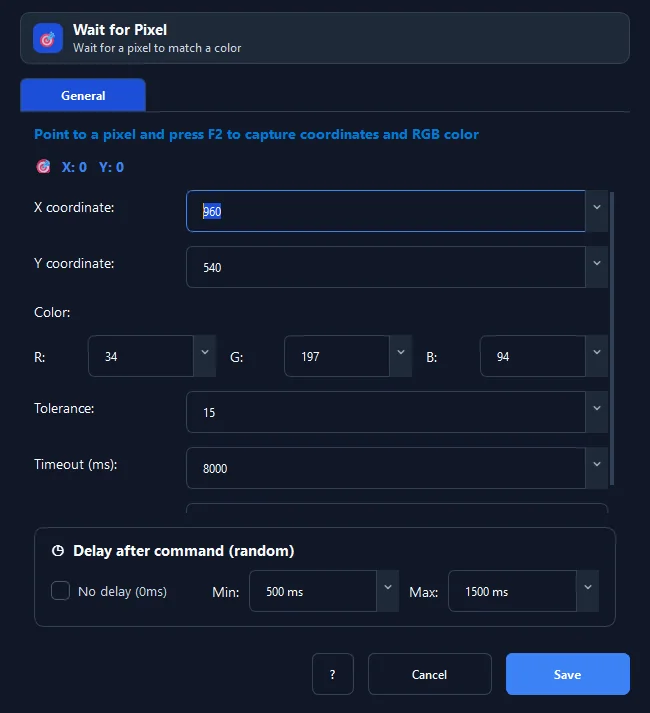
The Wait Pixel command continuously monitors the RGB (Red, Green, Blue) color value at exact screen coordinates (X, Y) and resumes execution immediately once the color matches target parameters within a configurable Tolerance range. With ultra-fast sampling and near-zero CPU overhead, Wait Pixel is the perfect lightweight visual sync mechanism for detecting status LED transitions, button color changes, or completion banners in custom canvas applications lacking UIA trees.
Screenshots & video#
When to use it#
- Waiting for a connection status indicator to change from red to green in device control utilities.
- Waiting for an action button to change background color once background compilation finishes.
- Detecting 100% completion on progress bars by inspecting the pixel at the bar's rightmost edge.
- Synchronizing canvas graphics, emulators, or game states where standard UIA trees are unavailable.
When not to use it#
- Target element position shifts dynamically across runs (use Find Image or Smart Desktop Wait).
- Web browser automation (use Smart HTML Wait).
Configuration steps#
- In RunMacro, open the Image › Wait Pixel command.
- Click 🎯 Pick Pixel and left-click the target on-screen pixel to automatically capture X, Y and RGB values.
- Set Tolerance (default 10–15 to accommodate minor OS anti-aliasing or compression shifts).
- Configure Timeout (ms) (e.g. 5000ms or 10000ms).
- Click Save to insert the command into your workflow.
Every option explained#
Expected result#
Execution resumes instantaneously once the target pixel matches designated RGB parameters.
Real example#
Example: Wait for status indicator to turn green RGB(34, 197, 94)#
- Add a Wait Pixel command after clicking 'Connect Device'.
- Use Pick Pixel to sample the LED indicator location.
- Set RGB to
(34, 197, 94), Tolerance to15, and Timeout to8000ms. - When connection establishes and the LED turns green, RunMacro resumes instantly to begin data transmission.
Limitations and failure cases#
- Windows Night Light or HDR color mapping may slightly shift raw RGB values.
Tips & common mistakes#
Verification details#
commands/wait.py· verified 2026-09-30